

The way that I have usually written C# .NET Core applications is to use Visual Studio 2017/2019 on my Windows laptop. Since my primary laptop is now a Mid-2012 MacBook Air, I have been using Visual Studio for Mac as my primary IDE for writing C# apps, mainly using Xamarin. I have been a big fan of Visual Studio Code for writing Node and Python apps, but I never tried to write a .NET Core app that targeted AWS Lambda. This article details the steps that I took in order to write my first C#-based Lambda function on my MacBook and deploy it to AWS.
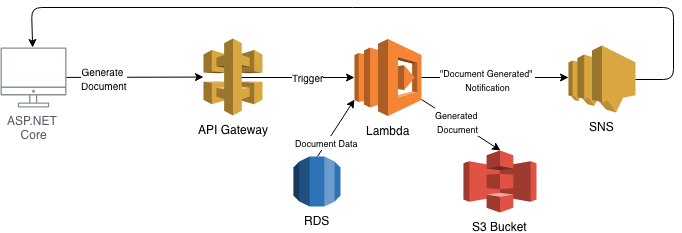
One of CTO-as-a-Service’s clients current has a synchronous function that is used to generate Microsoft Word documents from data that is stored in an SQL Server database. Currently, the document generation process runs on a single HP DL360 server. When many people need to generate documents at the same time, the performance of the server degrades so severely that it impacts the company.
As part of the migration to AWS that I am doing, I wanted to take this document-generation process and move it to a Lambda function on AWS. This way, when the company has to generate a lot of documents at month-end, we can kick off a Lambda function that would generate a single document. The generated document will then be stored on S3, and a notification would be broadcast on SNS.
I wanted to write refactor the code as a Lambda function, but I wanted to do so using Visual Studio Code on my lightweight MacBook instead of using my much-heavier Windows machine. Of course, I could have used my MacBook to remote into my Windows machine, but out of curiosity, I wanted to see if I could do everything on my MacBook.
The first step was to read the AWS documentation on writing Lambda functions using C#. The AWS reference article on .NET development and Lambda functions is here:
https://docs.aws.amazon.com/lambda/latest/dg/dotnet-programming-model.html
Prerequisites on your Computer
Install the AWS CLI
Install the extensions to the dotnet command line. These extensions will let you deploy and invoke a Lambda function from the command line.
dotnet tool install -g Amazon.Lambda.Tools
Install the AWS Lambda Templates extension to the dotnet command line, and ensure that the AWS templates have been installed
dotnet new -i Amazon.Lambda.Templates
Make sure that the new templates have been installed by running this command:
dotnet new -all
In order to generate the code, you need to know which profile you will be using when the Lambda function is deployed and executed. You can find the name of your profile by viewing the file ~/.aws/credentials. The profile should contain your access key, your secret key, and optionally, the region and the output format.
Also, before you start, go into the IAM console on AWS and make sure that the IAM role that you use has policies that will let you access Lambda functions, as well as letting the Lambda functions access certain AWS services (like S3, SNS, Dynamo, etc).

In Visual Studio Code, you should do the following:
- Install the AWS Toolkit for Visual Studio Code extension
- Make sure that the various C# extensions have been installed, most notably C# for Visual Studio Code
- Install the NuGet Package Manager extension
Generate the Project and Code
Generate a simple skeleton project
Open us a Terminal. Create a new directory, and cd to that directory. For example,
mkdir MyFirstLambda
cd MyFirstLambda
We want to generate the skeleton project and code. Run the command:
dotnet new lambda.EmptyFunction –name DocGenerator –profile default –region us-east-1
This will create a directory called ./MyFirstLambda/DocGenerator.
Notice that we are using a profile named default. This should be an entry in the ~/.aws/credentials file.
In Visual Studio Code, open the folder containing your new project. Note that you should open the folder below the new directory you created. In the case above, open the DocGenerator folder, not the MyFirstLambda folder.
When you open this folder in Visual Studio Code, you will be prompted to restore some files. In addition, the .vscode directory might be created for you.
Add build, deploy, and invoke commands to the tasks.json file. (see the Appendix below)
Once the tasks.json file has been set up, you have three commands available to you. Build, Deploy, and Invoke. I just cycle through these commands using Visual Studio Code’s Terminal/Run Task menu. At the end of this cycle, you should have your new Lambda function built, deployed on AWS, and tested.
A simple Lambda function will be generated for you. This function looks like this:
// Function.cs

using Amazon.Lambda.Core;

// Assembly attribute to enable the Lambda function's JSON input to be converted into a .NET class.
[assembly: LambdaSerializer(typeof(Amazon.Lambda.Serialization.Json.JsonSerializer))]

namespace DocGenerator
{
   public class Function
   {
       public string FunctionHandler(string input, ILambdaContext context)
       {
           return input?.ToUpper();
       }
   }
}
The entry point is defined in the file named ./src/DocGenerator/aws-lambda-tools-defaults.json
"function-handler" :
    "DocGenerator::DocGenerator.SNSFunction::FunctionHandler"
Once your Lambda function is running, you can use the AWS Explorer panel to view the Lambda.
Adding SNS Support
In Visual Studio Code, go to the Command Palette, and use the NuGet Package Manager:Add Package function to install the Amazon.Lambda.SNSEvents package.
Write the new SNS function handler.
using Newtonsoft.Json;

namespace DocGenerator
{
    public class Function
    {
        public void SNSMessageFunctionHandler(SNSEvent snsEvent, ILambdaContext context)
        {
            var jsonEvent = JsonConvert.SerializeObject(snsEvent);
            var jsonContext = JsonConvert.SerializeObject(context);

            context.Logger.Log(jsonEvent);
            context.Logger.Log(jsonContext);
            context.Logger.LogLine("-----------------------------------------");
        }
    }
}
In ./src/DocGenerator/aws-lambda-tools-defaults.json, change the function handler:
“function-handler” : “DocGenerator::DocGenerator.Function::SNSMessageFunctionHandler”
Build and deploy the new code.
Testing the Code
Go into the SNS Console and create a new topic. Let’s call it Simple-Lambda-Notification.
In the SNS Console, create a new subscription for this topic. For the protocol, choose AWS Lambda. For the endpoint, choose the DocGenerator function.
In the SNS Console, publish a message on the topic. Then look at the CloudWatch log. You should see the log messages that indicate that the message was received from SNS.
The Lambda Context
The LambdaContext is passed into the handler function and contains information about the environment that the function is operating in. You can use the LambdaContext to perform logging to CloudWatch, to determine who called the function, and to get the unique request id in case you need to notify the caller asynchronously that the function has completed. The LambdaContext looks like this:
{
 "FunctionName": "DocGenerator",
 "FunctionVersion": "$LATEST",
 "LogGroupName": "/aws/lambda/DocGenerator",
 "LogStreamName": "2019/04/30/[$LATEST]10dd5bcf08994166b84a1d3189f2f18b",
 "MemoryLimitInMB": 256,
 "AwsRequestId": "c533b777-e333-45ca-a78e-0b12d63c513d",
 "InvokedFunctionArn": "arn:aws:lambda:us-east-1:901643335044:function:DocGenerator",
 "RemainingTime": "00:00:27.7060000",
 "ClientContext": null,
 "Identity": {
 "IdentityId": "",
 "IdentityPoolId": ""
 },
 "Logger": {}
}
Adding Support for the API Gateway
As illustrated in the architecture diagram above, the entry point to our Lambda function should be a REST call emanating from the AWS API Gateway.
You need to import the NuGet package named Amazon.Lambda.APIGatewayEvents in order to be able to use the C# classes that support the AWS API Gateway.
Create a new class called APIGatewayFunction. Here is the code:
using Amazon.Lambda.Core;
using Amazon.Lambda.APIGatewayEvents;
using Newtonsoft.Json;
using System.Collections.Generic;
using System.Net;

namespace DocGenerator
{
   public class APIGatewayFunction
   {
       public APIGatewayProxyResponse FunctionHandler(APIGatewayProxyRequest request,
                                                      ILambdaContext context)
       {
           var jsonEvent = JsonConvert.SerializeObject(request);
           var jsonContext = JsonConvert.SerializeObject(context);

           context.Logger.Log(jsonEvent);
           context.Logger.Log(jsonContext);
           context.Logger.LogLine("-----------------------------------------");

           return this.CreateResponse(request);
       }

       private APIGatewayProxyResponse CreateResponse(APIGatewayProxyRequest request)
       {
           int statusCode = (request != null) ?  (int) HttpStatusCode.OK
                                              : (int) HttpStatusCode.InternalServerError;

           PostPayload payload = JsonConvert.DeserializeObject<PostPayload>(
                          request.Body ?? "{\"message\": \"ERROR: No Payload\"}");

           // The response body is just the upper-case version of the string
           // that was passed in
           string body = (payload?.message != null)
                               ? JsonConvert.SerializeObject(payload.message.ToUpper())
                               : string.Empty;

           var response = new APIGatewayProxyResponse
           {
               StatusCode = statusCode,
               Body = body,
               Headers = new Dictionary<string, string>
               {
                   { "Content-Type", "application/json" },
                   { "Access-Control-Allow-Origin", "*" }
               }
           };

           return response;
       }
   }

   public class PostPayload
   {
       public string message { get; set;}
   }
}
In ./src/DocGenerator/aws-lambda-tools-defaults.json, change the function handler:
"function-handler" : "DocGenerator::DocGenerator.APIGatewayFunction::FunctionHandler"
Build and deploy the new code. Now it’s time to create a new API Gateway that will be used to handle the REST integration to the Lambda function.
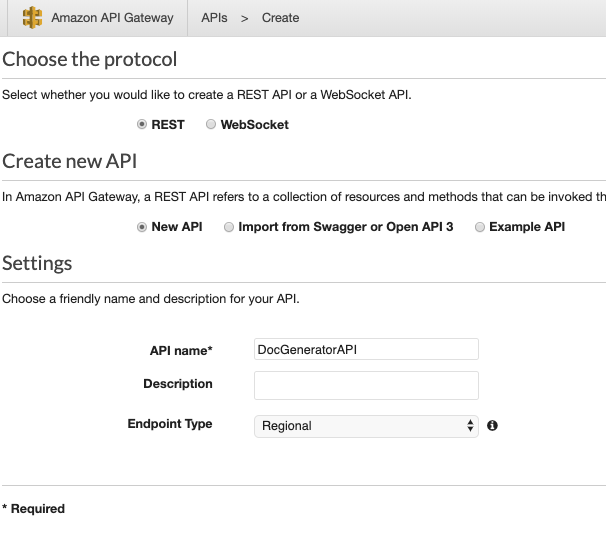
Create the API Gateway
In the first step, we go into the API Gateway dashboard and create a new REST API called DocGeneratorAPI.
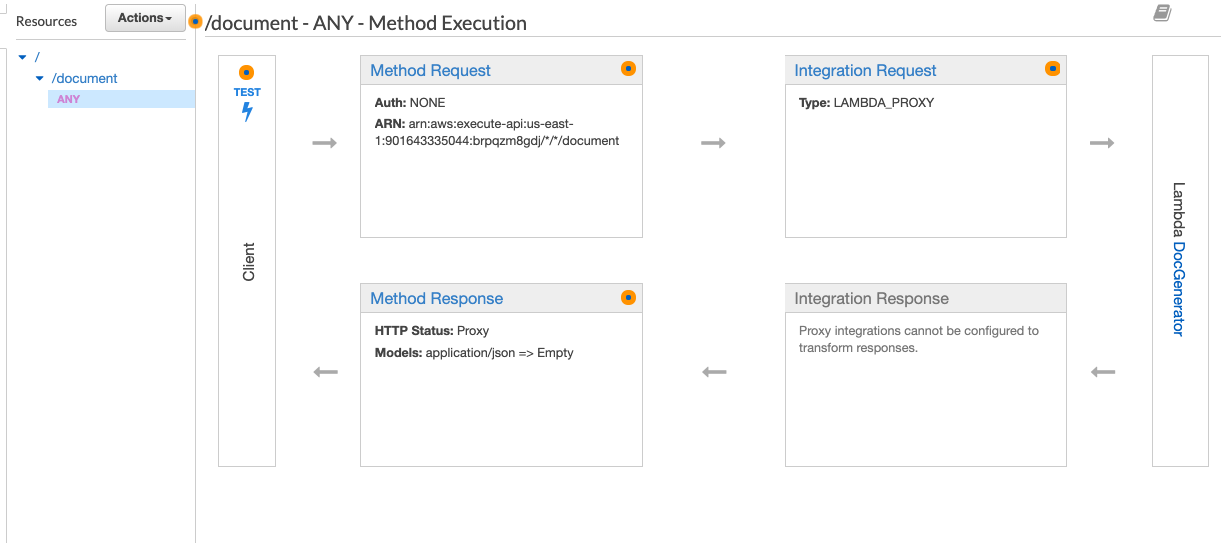
We will create a single resource called Document. Any API calls for this resource should contain /document in the URL path.

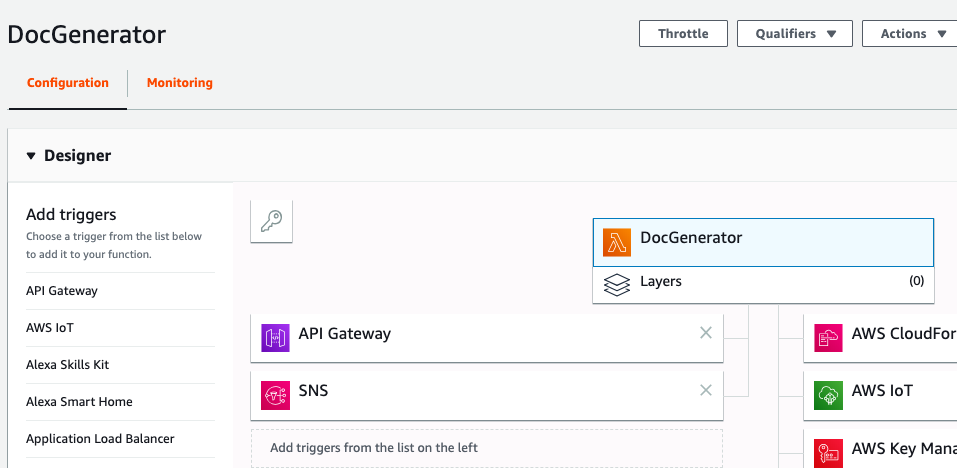
We will hook up the API to the new DocGenerator Lambda function that we just created. Notice that we check the Use Lambda Proxy Integration option.

After saving the API, we will just go to the Lambda dashboard for a second to make sure that the API Gateway is a new input source for the Lambda.
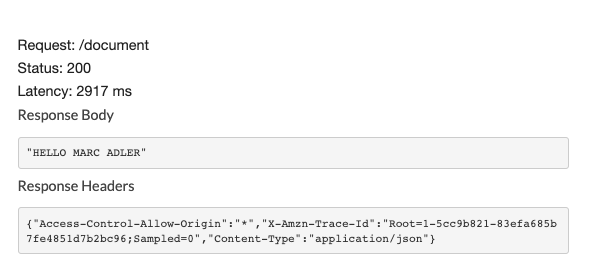
Back in the API Gateway dashboard, we want to test the new API. Click on the blue lightning bolt in order to run a test.
We will POST a request that has a simple message body. If successful, we should get a response that has a capitalized version of the message.

We see that the response is indeed the capitalized version.
We can examine the APIGatewayProxyRequest that our function was invoked with.
{
    "Resource": "/document",
    "Path": "/document",
    "HttpMethod": "POST",
    "Headers": null,
    "MultiValueHeaders": null,
    "QueryStringParameters": null,
    "MultiValueQueryStringParameters": null,
    "PathParameters": null,
    "StageVariables": null,
    "Body": "{\n    \"message\": \"This is a document\"\n}",
    "RequestContext": {
        "Path": "/document",
        "AccountId": "XXXXXXXXXXXXXXXX",
        "ResourceId": "ec0wv3",
        "Stage": "test-invoke-stage",
        "RequestId": "88182293-6c2a-11e9-9e20-09edba43f9b6",
        "Identity": {
            "CognitoIdentityPoolId": null,
            "AccountId": "XXXXXXXXXXXXXXXX",
            "CognitoIdentityId": null,
            "Caller": "XXXXXXXXXXXXXXXX",
            "ApiKey": "test-invoke-api-key",
            "SourceIp": "test-invoke-source-ip",
            "CognitoAuthenticationType": null,
            "CognitoAuthenticationProvider": null,
            "UserArn": "arn:aws:iam::XXXXXXXXXXXXXXXX:root",
            "UserAgent": "aws-internal/3 aws-sdk-java/1.11.534 Linux/4.9.137-0.1.ac.218.74.329.metal1.x86_64 OpenJDK_64-Bit_Server_VM/25.202-b08 java/1.8.0_202 vendor/Oracle_Corporation",
            "User": "XXXXXXXXXXXXXXXX"
        },
        "ResourcePath": "/document",
        "HttpMethod": "POST",
        "ApiId": "brpqzm8gdj",
        "ExtendedRequestId": "ZAtsDEw2oAMFu6Q=",
        "ConnectionId": null,
        "ConnectionAt": 0,
        "DomainName": "testPrefix.testDomainName",
        "EventType": null,
        "MessageId": null,
        "RouteKey": null,
        "Authorizer": null
    },
    "IsBase64Encoded": false
}
Enhancements
You might notice that the FunctionHandler in the C# code does not examine the HttpMethod and the Path of the request in order to implement different behaviors. The code assumes that a POST request and a specific payload are being passed in. Of course, the FunctionHandler needs to be made bullet-proof so that it will handle different methods and paths.
Appendix
tasks.json
The tasks.json file is located in the .vscode directory of a project and contains a JSON-formatted list of tasks that Visual Studio Code can invoke.
{
    "version": "2.0.0",
    "tasks": [
        {
            "label": "build",
            "command": "dotnet",
            "type": "process",
            "args": [
                "build",
                "${workspaceFolder}/test/DocGenerator.Tests/DocGenerator.Tests.csproj"
            ],
            "problemMatcher": "$tsc"
        },
        {
            "label": "deploy",
            "command": "dotnet",
            "type": "process",
            "args": [
                "lambda",
                "deploy-function",
                "DocGenerator",
                "--region",
                "us-east-1",
                "--profile",
                "default",
                "--function-role",
                "woof_garden_canary"
            ],
            "options": {
                "cwd": "${workspaceFolder}/src/DocGenerator"
            },
            "problemMatcher": []
        },
        {
            "label": "invoke",
            "command": "dotnet",
            "type": "process",
            "args": [
                "lambda",
                "invoke-function",
                "DocGenerator",
                "--region",
                "us-east-1",
                "--profile",
                "default",
                "--payload",
                "Just Checking If Everything is OK"
            ],
            "problemMatcher": []
        }
    ]
}