

Marc Adler
CTO as a Service
Introduction
Since leaving the corporate workforce and starting CTO as a Service, I have been slowly learning some things that have been on my TODO list for a while. Not having full-time management duties frees up your time, and every day, I find that there is so much more to learn. So, as I wind my way down the TODO list, I figure that I would start documenting some of my learnings so that it might be of use to others.
Even though I have been a Chief Architect and CTO for the last 15 years, I have still kept myself very technical, and I still code for pleasure, and occasionally, for my CTO as a Service clients. I am pretty good at C#, Java, C++, and NodeJS/TypeScript. I can also stumble around in Python and Scala.
One of the languages that I have been meaning to teach myself in Golang. I kept hearing that Go is a great language for writing distributed systems, and I certainly have written my fair share of distributed systems. I started life way back when as a C programmer, and with Golang, I feel that I have come full-circle. The nice thing about Golang is the support for writing multi-threaded applications.
I always like to write something useful when I learn about new technologies. I have been spending an increasing amount of time in Slack, and I come from the world of finance. So I figured that I could combine the two for my first application in Go
| The source code to this project can be found here https://github.com/magmasystems/SlackStockSlashCommand |
Outline of the Steps We Will Take
- Create a console-based Go program that gets the price of a stock
- Make the application run in a web server
- Run the application using a local tunnel
- Change the code so it uses the Go-based Slack API to support a Slack Slash Command
- Create a new Slack application that has a Slash Command
- Point the new Slack application to the application that is running on the local server
- Test the Slash Command from within Slack
- Migrate to AWS by creating a new Elastic Beanstalk-based application
- Migrate our existing code so that it runs on Elastic Beanstalk
- Deploy the code to Elastic Beanstalk
- Change our Slack application so that it points to the new Elastic Beanstalk server
- Test the Slash Command again from within Slack
First Steps
The first thing that I wanted to do is just to write a simple Go program that retrieved the price of MSFT stock and printed it out on the terminal. Easy enough, right? Just a simple HTTP GET request to the website of a quote provider.
It used to be as simple as making a call to the Yahoo Finance API. However, Yahoo deprecated their API, so I had to do a search for other quote providers who had up-to-date quote data that you could access for free. I did a search on Quora and found this discussion. I decided to try three quote providers: Quandl, AlphaVantage and World Trading Data.
In order to be flexible in choosing a specific quote provider, I implemented a driver factory in the code. I also put the authentication information for each quote provider within the application’s configuration file.
I used Visual Studio Code as my IDE for this project. VSC has extensions that support Golang and provides a very light way to just dive right in and write Golang code.
The code below shows the simple main loop. You are prompted to type the name of a symbol, and then the quote provider is called to retrieve the price of the stock.
package main

import (
    "bufio"
    "encoding/json"
    "errors"
    "fmt"
    "io/ioutil"
    "log"
    "os"
    "strings"

    av "./alphavantageprovider"
    quandl "./quandlprovider"
    q "./quoteproviders"
    wtd "./worldtradingdata"
)

var quoteProvider q.QuoteProvider

func main() {
    appSettings := getConfig()
    driver := appSettings.Driver
    apiKey := appSettings.APIKeys[driver]

    quoteProvider, _ = quoteProviderFactory(driver, apiKey)

    scanner := bufio.NewScanner(os.Stdin)
    print("Enter the symbol: ")
    for scanner.Scan() {
        symbol := scanner.Text()
        if len(symbol) == 0 {
            break
        }
        price := quote(symbol)
        fmt.Println(price)
        print("Enter the symbol: ")
    }
}
The quoteProviderFactory method simply returns the driver whose name was specified in the appSettings.json file.
// quoteProviderFactory - a factory that creates a quote provider
func quoteProviderFactory(providerName string, apiKey string) (q.QuoteProvider, error) {
    var provider q.QuoteProvider

    switch strings.ToLower(providerName) {
    case "alphavantage":
        provider = av.CreateQuoteProvider(apiKey)
    case "worldtradingdata":
        provider = wtd.CreateQuoteProvider(apiKey)
    case "quandl":
        provider = quandl.CreateQuoteProvider(apiKey)
    default:
        return nil, errors.New("the Quote Provider cannot be found")
    }

    return provider, nil
}
In the C# world, I would probably have put the full .NET type name of the driver within the config file, and used Activator.CreateInstance() to instantiate the driver. I don’t like having to explicitly reference the namespace of the individual drivers in Golang. I just have to get used to the fact that Golang does not have the same “power” as C#.
The Quote Provider
The quote provider package just provides a simple way of requesting the prices of a stock. We basically do the following steps:
- Format a URL for the specific quote service. That URL contains the name of the stock.
- Make an HTTP GET call to the quote service’s API.
- Marshal the returned payload into a Golang struct.
- Return the value of the field in the struct that has the stock’s current price.
All of the quote providers “inherit” from a “base class” called BaseQuoteProvider. I use quotes around the terms “inherit” and “base class” because Golang has no concept of classes and inheritance. Golang uses composition instead of inheritance.
const quoteURL = "https://www.alphavantage.co/query?function=GLOBAL_QUOTE&symbol={symbol}&apikey={apiKey}"

// AVQuoteProvider - gets quotes from the provider
type AVQuoteProvider struct {
    qp.BaseQuoteProvider
}

// CreateQuoteProvider - creates a new quote provider
func CreateQuoteProvider(apiKey string) qp.QuoteProvider {
    quoteProvider := new(AVQuoteProvider)
    quoteProvider.APIKey = apiKey
    return quoteProvider
}

// FetchQuote - gets a quote
func (provider AVQuoteProvider) FetchQuote(symbol string) float32 {
    url := provider.PrepareURL(quoteURL, symbol)
    payload, err := provider.FetchJSONResponse(url)

    if err == nil {
        data := new(quoteData)
        json.Unmarshal(payload, &data)
        //fmt.Println(data)

        f, _ := strconv.ParseFloat(data.GlobalQuote.Price, 32)
        return float32(f)
    }

    return 0
}
Now that everything was working, it was time to start thinking about integrating the quote provider with Slack.
Integrating the Quote Provider with Slack
Since I spend so much time within Slack, I would like the ability to manually check the current price of a stock from within a Slack channel. I want to issue a Slack Slash Command like “/quote symbol”, and have Slack print out the name of the stock and its current price.
Note: I called this project a Stock “bot”, but in Slack vernacular, a bot and a slash command are two different things. A bot is like a Slack user, and it has full access to the Slack message stream.
There are many enhancements that can be made to this “quote server”, such as being delivered the most recent prices at a regularly-scheduled interval, or altering a user when a stock crosses some sort of limit. But, for now, I want to keep things very simple and just be able to see the price of a single stock when I want it.
This article was helpful in outlining the steps that you need to take in order to create a new Slack application that supports Slash Commands.
The Slack API and Golang
The first thing that I needed to do was to find a Golang version of the Slack API. There seems to be one Github project that is popular among Go developers. This package can be found here:
https://github.com/nlopes/slack
The Golang/Slack API has some structs and methods that marshal HTTP requests to and from Slack. All that I needed to do was read an HTTP GET request that comes from Slack, parse the request into a SlashCommand object, call the QuoteProvider to retrieve the price of the stock and return that data back to Slack. A fairly simple enhancement.
We have to import the Golang/Slack package. In C# you would use NuGet, and in Java, you might use Maven. In Golang, you need to download the package to your local machine. In a terminal, run the command:
go get github.com/nlopes/slack
This command will download the package and put it into a directory that is in your GOPATH. On my MacBook, it is placed in the directory ~/go/pkg/darwin_amd64/github.com/nlopes/slack
Inside the program, you can import directly from a URL.
| import “github.com/nlopes/slack” |
In the code, we will start a web server to process the requests from Slack. We need to first retrieve the signing secret that Slack gives us when we create a new Slack app. More on that below.
We have an HTTP request handler. The request is marshaled into a SlashCommand object, and the quote provider is called. The data is formatted and returned to Slack.
// Get the signing secret from the config
signingSecret := appSettings.SlackSecret
if signingSecret == "" {
    log.Fatal("The signing secret is not in the appSettings.json file")
}

// The HTTP request handler
http.HandleFunc("/quote", func(w http.ResponseWriter, r *http.Request) {
    slashCommand, err := processIncomingRequest(r, w, signingSecret)
    if err != nil {
        return
    }

    // See which slash command the message contains
    switch slashCommand.Command {
    case "/quote":
        getQuotes(slashCommand, w)

    default:
        // Unknown command
        w.WriteHeader(http.StatusInternalServerError)
        return
    }
})
The incoming request is first verified against the signing secret, just to make sure that there are no man-in-the-middle attacks. The new SlashCommand object is returned to the caller.
func processIncomingRequest(r *http.Request, w http.ResponseWriter, signingSecret string) (slashCommand slack.SlashCommand, errs error) {
    verifier, err := slack.NewSecretsVerifier(r.Header, signingSecret)
    if err != nil {
        w.WriteHeader(http.StatusInternalServerError)
        return
    }

    r.Body = ioutil.NopCloser(io.TeeReader(r.Body, &verifier))
    slashCommand, err = slack.SlashCommandParse(r)
    if err != nil {
        w.WriteHeader(http.StatusInternalServerError)
        return slashCommand, err
    }

    // Verify that the request came from Slack
    if err = verifier.Ensure(); err != nil {
        w.WriteHeader(http.StatusUnauthorized)
        return slashCommand, err
    }

    return slashCommand, nil
}
The getQuotes() function parses the slash command in order to get the multiple stock symbols. We call the quote provider as a Goroutine, and wait on a channel for the quote provider to retrieve all of the quotes.
We format the symbols and the prices into a single text block, and we create a SlackMsg that will contain the response. We then send the JSON-encoded message back to Slack.
func getQuotes(slashCommand slack.SlashCommand, w http.ResponseWriter) {
    outputText := ""

    symbols := strings.Split(slashCommand.Text, ",")
    go func() {
        theBot.QuoteAsync(symbols)
    }()

    select {
    case quotes := <-theBot.QuoteReceived:
        for _, q := range quotes {
            outputText += fmt.Sprintf("%s: %3.2f\n", strings.ToUpper(q.Symbol), q.LastPrice)
        }
        // Create an output message for Slack and turn it into Json
        outputPayload := &slack.Msg{Text: outputText}
        bytes, err := json.Marshal(outputPayload)

        // Was there a problem marshalling?
        if err != nil {
            w.WriteHeader(http.StatusInternalServerError)
            return
        }
        // Send the output back to Slack
        w.Header().Set("Content-Type", "application/json")
        w.Write(bytes)

    case <-time.After(3 * time.Second):
        w.WriteHeader(http.StatusInternalServerError)
    }
}
As you can see, all we did to integrate the quote provider with Slack is to read the request from Slack, get the prices, marshal the data into a response that Slack can understand, and send the response back to Slack.
Now we have to create a new Slack application and a Slash Command and hook our code up to Slack.
Hooking up Slack to the SlashCommand
The first thing we need to do is to tell Slack how to access the quote server. But first, we will talk about local development for testing.
Local Tunnel
For a first step, I want to have my quote server run on a local web server on my laptop. But how will Slack know how to “reach in” and communicate with my local web server? The answer is to use a local tunnel proxy.
There are a few frameworks for establishing a local tunnel between Slack and your laptop. Such frameworks include:
For now, I am going to use localtunnel. To install it, go into a Terminal and run the command
| npm install -g localtunnel |
Running the Stockbot Locally
Start Stockbot normally.
| go run application.go |
Then launch localtunnel.
| $ lt –port 5000 –subdomain slackstockbot your url is: https://slackstockbot.localtunnel.me |
As you can see, Stockbot can be accessed at https://slackstockbot.localtunnel.me:5000. Remember this URL because we need to tell Slack the address where it directs the /quote command to.
Creating a New Slack Application
The first thing to do is to create your own private Slack workspace in which you can experiment. I created a new Slack workspace for my CTO as a Service consultancy. This new workspace can be found at ctoasaservice.slack.com.
The Slack API homepage allows you to create a new Slack app.
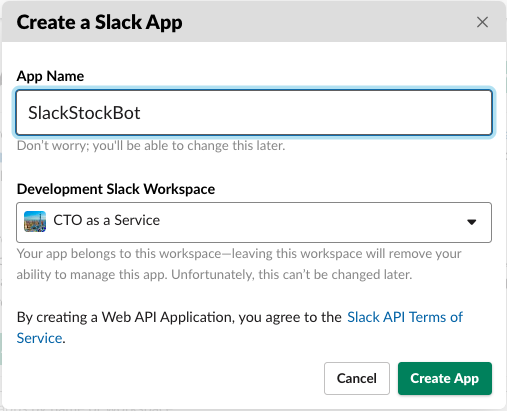
Slack will automatically assign you various secret codes that you will use for authorization and verification purposes.

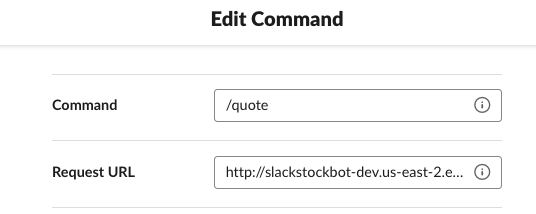
Then you will choose the box that says “Create a Slash Command”. You will be presented with another form in which you will specify the syntax of the new Slash Command, along with the Request URL (remember I told you to remember that localtunnel URL).
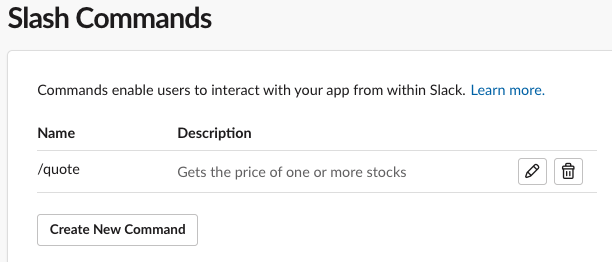
The /quote command will take a comma-separated list of strings, where each string is the symbol of a stock.

After saving the form, Slack will confirm that it knows about the new Slash Command.

Now we can set up OAuth and permissions so that Slack can finish connecting your Slack workspace to the new app.

Click on the Install App to Workspace button.

You will get your OAuth token. Also, input the redirect URL.
When all of this is done, Slack will ask you to install the app within your Slack workspace.

Click on the Install button. When this is done, Slack will show you that the Stockbot app is now installed within your workspace.
Testing the Stockbot
Run the Stockbot app and run the localtunnel
| go run application.go lt –port 5000 –subdomain slackstockbot |
Now go into the Slack workspace, and in the message area, type a slash. Slack will begin to show you the list of slash commands that are available. As you type more, Slack will further filter the list of available commands. Finally, when you type /quote, Slack will show you the Stockbot command.

Type /quote AMZN. Slack should then come back with the current price of Amazon’s stock.
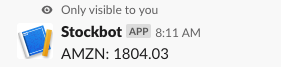
Success !!!!!!
Next Steps – Moving to the Cloud
Now that we have everything running on a local web server, the next step is to move it to an external host. For that, we will use Amazon Web Services (AWS). There is a service on AWS called Elastic Beanstalk that makes the process of setting up a web application very simple. There are a few small files that we will need to add to our application in order to have it work properly within Elastic Beanstalk.
In order to move the Stockbot to Elastic Beanstalk, I am going to take a slight detour. I will set up the Elastic Beanstalk web server, download the sample Go-based application code that Elastic Beanstalk generates, merge the Stockbot code into the generated code, and then deploy the merged code up to Elastic Beanstalk.
An Outline of What We Will Do
- Create the Elastic Beanstalk-based Go application for the Slack Stock Bot. This application will come with some sample code that Elastic Beanstalk generates.
- Set up a directory on our local machine for our Slack Stock Bot source code, and initialize that directory.
- Set up SSH
- Copy the generated sample code to our local directory so that we can have a jump-start.
- Modify the generated code so that it implements all of the logic in our Slack Stock Bot.
- Deploy the new code to the Elastic Beanstalk environment
Setting up Elastic Beanstalk on AWS
Prerequisites
- Download the Elastic Beanstalk command line utility to your local computer.
- On AWS, create a new key pair, and call it aws-eb.
- After the key pairs are created, the files aws-eb and aws-eb.pub should be located in your ~/.ssh directory.
Create the new ElasticBeanstalk Application
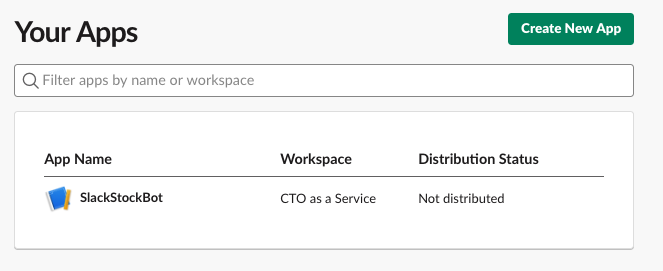
Go to ElasticBeanstalk. We are going to create a new Go application called Slackstockbot.
I chose the option to create a sample application, just so I have some AWS config files that I know will work.

After clicking on the Create New Application link, we will see this

Create the New ElasticBeanstalk Environment
An application can have multiple environments. For example, one environment might be “production” and another environment might be “development”.
In the dashboard, find the Actions button and choose the Create New Environment menu. Then create a new Web Server Environment.
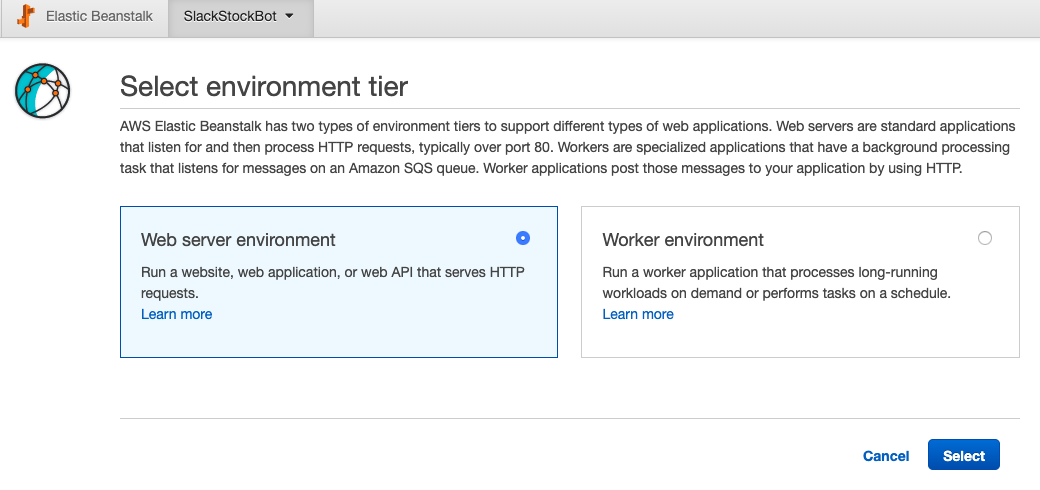
After you click on the Select button, you will get a dialog that lets you configure the new environment.
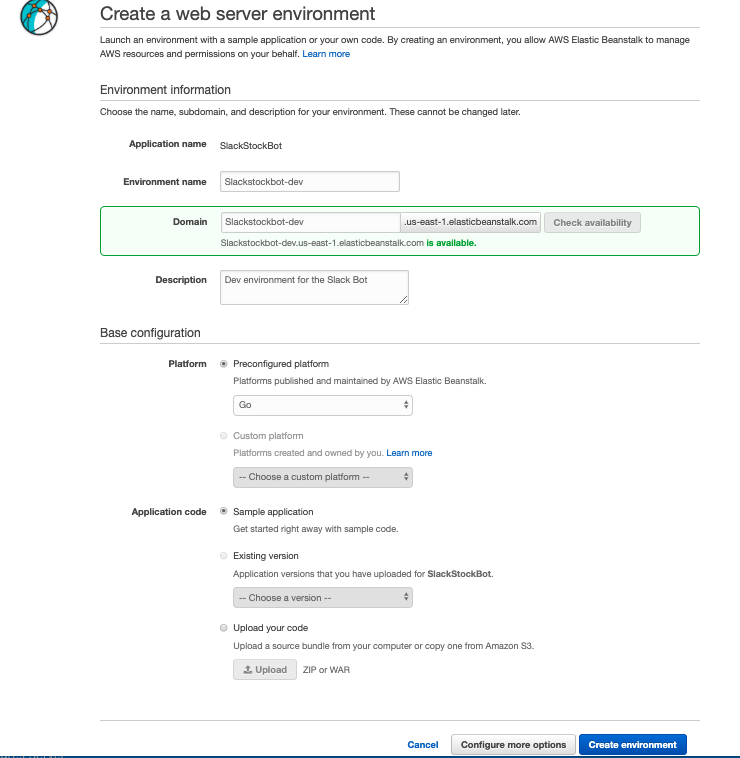
After you click on the Create button, ElasticBeanstalk will start to create a new environment. This takes a few minutes.
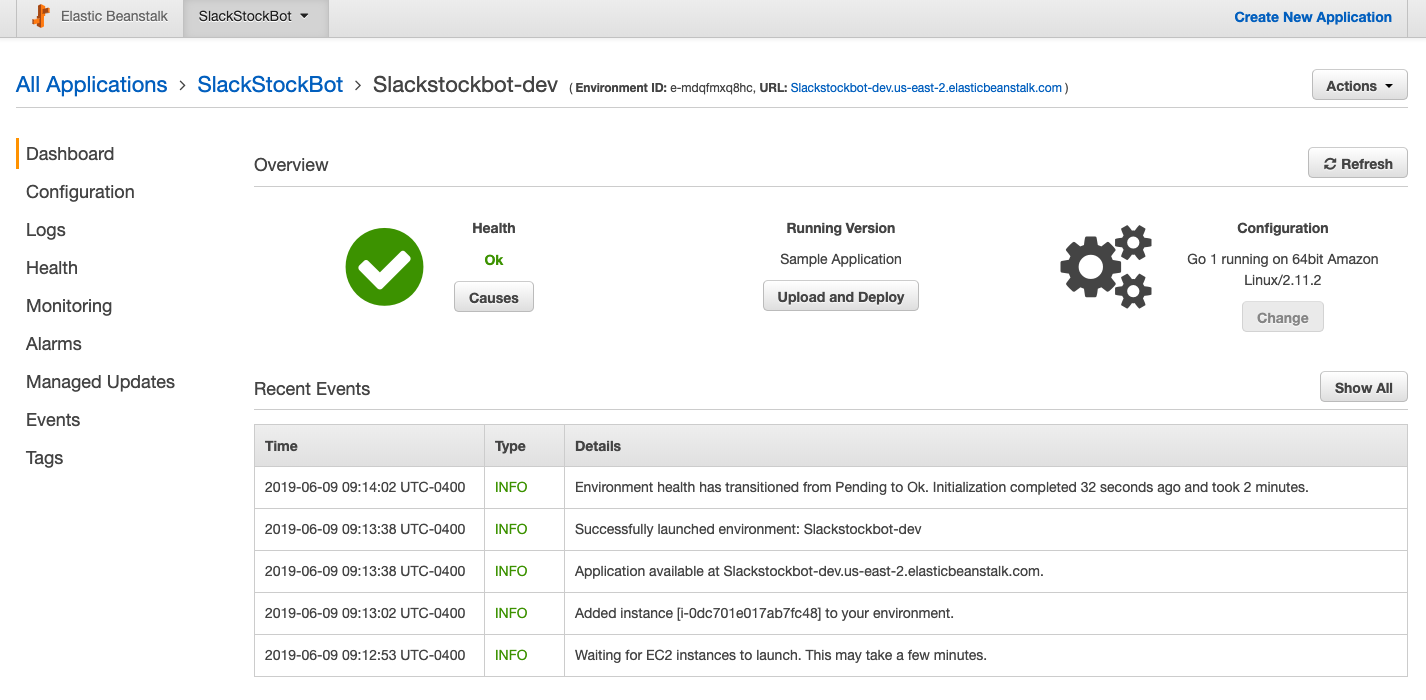
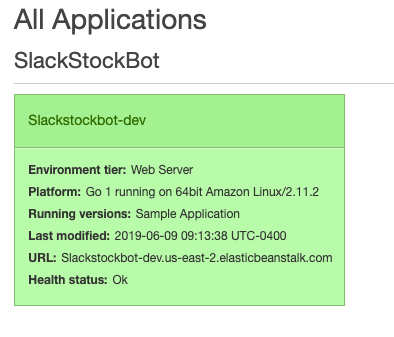
When the new environment has been created, you can see it in the ElasticBeanstalk dashboard.
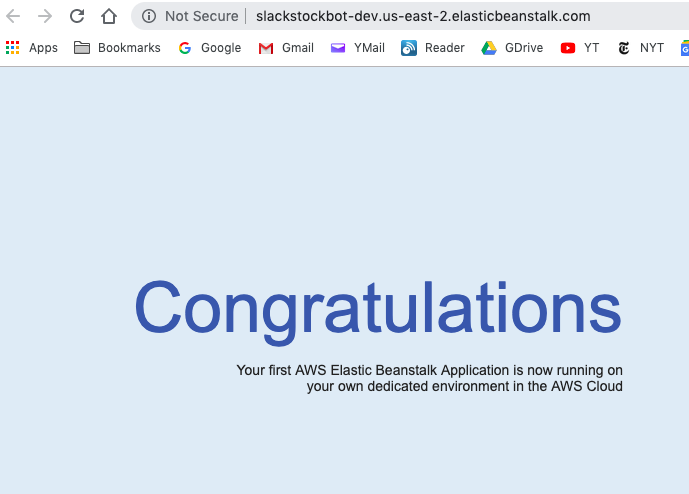
If you navigate to this new site using Chrome, you will see the following website:
Getting the Source Code Ready
Create a new directory that will hold the source code of the new Slackstockbot. I created a new directory in ~/Projects/SlackStockBot.
We need to initialize the source code directory for ElasticBeanstalk to use. We created SlackStockBot in the us-east-2 region.
Run the command
| eb init |
You will see a list of AWS regions. After we choose the proper region, you should see SlackStockBot come up in the list of available applications.

Setting up SSH on the New Environment
We will eventually need to SSH into the new EC2 instance that is associated with the new environment. From the same directory that you used above, enter the command:
| eb ssh –setup slackstockbot-dev |

SSH into the New Server
Run the command
| eb ssh slackstockbot-dev |
You should see something like this:
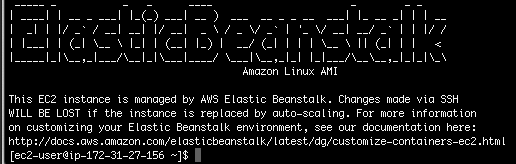
The newly-deployed Go app will be in the /var/app/current directory.

To find out the IP address of the new instance, you can go into the EC2 dashboard and find the machine that was just created for the new instance.
The Go Source Code to the Sample Website
When we first set up the EB application, we chose to have sample code generated for us. The sample code is shown below.
A log file is set up, and the HTTP server listens on port 5000 for GET and POST requests. If a GET / request is received, it serves up index.html. If POST is received, the body of the post is echoed. If a POST /scheduled is received, then some info from the request headers is logged.
package main

import (
   "io/ioutil"
   "log"
   "net/http"
   "os"
)

func main() {
   port := os.Getenv("PORT")
       if port == "" {
           port = "5000"
       }

       f, _ := os.Create("/var/log/golang/golang-server.log")
       defer f.Close()
       log.SetOutput(f)

       const indexPage = "public/index.html"
       http.HandleFunc("/", func(w http.ResponseWriter, r *http.Request) {
           if r.Method == "POST" {
               if buf, err := ioutil.ReadAll(r.Body); err == nil {
                   log.Printf("Received message: %s\n", string(buf))
               }
           } else {
               log.Printf("Serving %s to %s...\n", indexPage, r.RemoteAddr)
               http.ServeFile(w, r, indexPage)
           }
       })

       http.HandleFunc("/scheduled", func(w http.ResponseWriter, r *http.Request){
           if r.Method == "POST" {
               log.Printf("Received task %s scheduled at %s\n",
                      r.Header.Get("X-Aws-Sqsd-Taskname"), r.Header.Get("X-Aws-Sqsd-Scheduled-At"))
           }
       })

       log.Printf("Listening on port %s\n\n", port)
       http.ListenAndServe(":"+port, nil)
}
We can change this source code so that the logic for the Slack Stock Bot is in there.
In the source directory is a Procfile. It’s just a single line:
web: bin/application
It specifies the name and path of the program to start. In this case, the compiled Go file named application should be run.
There is also a Buildfile that tells ElasticBeanstalk how to build your application. In this case, it’s just a single-line file:
build: go build -o bin/application application.go
Copying Files To and From the New EC2 Machine
Now we can use scp to recursively copy all of the files from the EC2 machine to the current directory on our local machine:
| scp -r -i ~/.ssh/slackstockbot-dev.pem ec2-user@3.13.171.203:/var/app/current/* . |
Notice that the key is in a file called slackstockbot-dev.pem. When I first set up SSH on the new server, it created a private key file called aws-eb (without an extension), because there was already a file called aws-eb.pem in the ~/.ssh directory. I copied aws-eb to a file named slackstockbot-dev.pem because it’s a more descriptive name.
Note that we can also use FileZilla instead of using scp.
Modify the Source Code
Now that we have download the Elastic Beanstalk-generated source code to our laptop, we need to merge the Slack Stock Bot code that we already wrote with the code that Elastic Beanstalk expects. Luckily, there isn’t too much to do.
There are a bunch of configuration and build files that were generated that Elastic Beanstalk needs. One is a directory called .elasticbeanstalk that contains some configuration files that Elastic Beanstalk needs. One is a file named Buildfile that tells Elastic Beanstalk how to build the source code that you deploy. The final file is named Procfile, and it tells Elastic Beanstalk how to run your Go application.
I want to mention how we need to change the Buildfile so that it does what we need.
The Slack Stock Bot is written in Go, and in order to interact with Slack, we use a package that is found on Github. This package is found at github.com/nlopes/slack. In order to import this package, we have the following line in our application.go file:
| import “github.com/nlopes/slack” |
Before Elastic Beanstalk builds the code, it has to install this package locally. We usually do this by issuing the command:
go get github.com/nlopes/slack
We need to make this command part of the build process. So, we will create a small shell file named build.sh that has the commands in it that will build the Stock Bot.
build.sh
| go get github.com/nlopes/slack go build -o bin/application application.go cp ./appSettings.json bin |
We also need to change the Buildfile to this:
Buildfile
build: build.sh
Deploying a New Version of the Application
We have to ZIP the source of the application up. Zip up everything from within the root. (Important: Do not run the ZIP command from the root folder of the project)

We can upload and deploy the new code from the Elastic Beanstalk console.

When you click on the Deploy button, you will see Elastic Beanstalk stop the environment, upload and build the new code, and restart the environment with the new code deployed in the /var/app/current directory.
If you see that the application did not start up properly, you will have to examine the log files. In the event that the github.com/nlopes/slack package did not download correctly, you may need to SSH into the server and pull it down yourself using the command go get github.com/nlopes/slack.
Pointing to the new URL
If you recall from above, our Slack Stock Bot still points to our local web server through the local tunnel. Now that we are being hosted on AWS, Slack needs to know about this new location.
You need to go back into the Slack API website and change the URL of the Slack Stock Bot so that it points to the new Elastic Beanstalk environment.
Click on SlackStockBot
Click on Add features and functionality
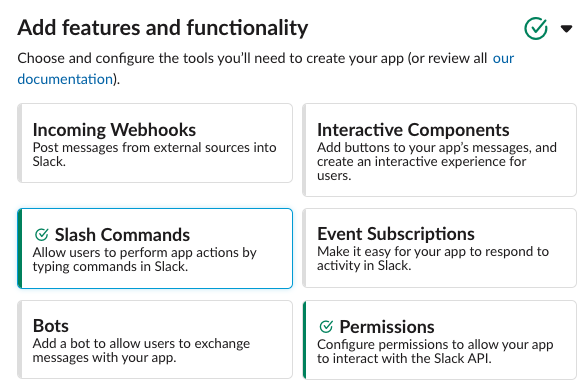
Click on Slash Commands
Click on /quote and enter the URL of the Elastic Beanstalk environment:
The Future
We have accomplished our mission, which was to write a first Golang application, integrate it with a Slack SlashCommand, and run the server on AWS.
There are some enhancements which I would like to make in the future.
- Make this available to other Slack workspaces besides my own. See item 2 below on why this is not feasible right now. (Hint – we are in danger of exhausting the quota of free quotes very quickly)
- Free unlimited real-time quotes. The three quote services all have limits around the number of quotes that you can request. Ideally, I would like to use a quote service that provides an unlimited number of quotes for free. Maybe if you are from Bloomberg or Reuters and you are reading this, how about giving me access to free quotes in exchange for attribution 🙂
- Alerting. I would like to have a user input a stock symbol and a target price, and be alerted through Slack when the stock reaches that target. This means using a database and storing a list of users, their webhooks, the symbols and the target prices. We could check stocks against their targets on a daily basis, or we can schedule the checks on a more frequent basis. It would also be ideal if the quote service provided alerts and could call into our server when a stock hits the target.
- More advanced analytics. We can deliver more information about the stock other than its current price.
- Graphs and better formatting. We can use Slack’s Blocks to provide a richer user interface.
- Trading. Wouldn’t it be cool to hook up an interface from Slack to your broker? Of course, there are all sorts of compliance and legal issues, but nevertheless, we can dream.
- Serverless. We can easily transform the quote-retrieval process into a lambda function.
About Me
| Marc Adler is the founder of CTO as a Service, a consultancy that provides senior-level technical services to companies who are in need of a CTO or Chief Architect on a “pay for what you use” basis. He was formerly the Chief Architect of companies like Citigroup, MetLife, ADP and Quantifi. He likes to get himself in trouble with his CIOs by insisting on coding. |